Discover how to create a storyboard for instructional design and some best practices to optimize the success of your elearning projects.
Just as you wouldn’t build a house without a blueprint, you should never begin an instructional design project without a clear plan. This is called an elearning storyboard.
It outlines every aspect of the course, from the graphics to videos to onscreen text. With so many moving parts, a clear storyboard makes it easy to plan instructional design projects and collaborate with stakeholders.
Think of it as your North Star, guiding you through the project, keeping you on track, and ensuring that your training course achieves your learning goals.
This guide covers everything you need to know about creating an instructional design storyboard, including a step-by-step guide and a free downloadable template [DOC].
Table of contents
- Step 1: Define a plan
- Step 2: Choose an instructional design model
- Step 3: Decide on a level of detail
- Step 4: Pull your resources
- Step 5: Select a storyboarding template
- Step 6: Add the content to your storyboard template
- Step 7: Get feedback from fresh eyes
What to include in a storyboard for instructional design
You should always tailor your elearning storyboard to align with your project, approach, and team. That said, there are certain elements that you should most definitely include in the storyboard.
Here’s an example of what’s usually included in a storyboard for instructional design:
- Titles, numbers and dates for all slides and assets
- All onscreen text, including instructions and call-to-action buttons
- Audio scripts, transcripts and notes for all voiceovers or narration
- Navigation buttons
- Mockups for all graphics, media, and animations
- Sequence outlines for all branching scenarios
- Any additional developer notes you think are relevant
Benefits of using a storyboard for instructional design projects
We’ll be honest. Creating a detailed elearning storyboard will take some time in the initial stages of your project. But it will save you much more time and resources in the long run.
An effective storyboard can provide a number of juicy benefits. Here’s a closer look:
- Provides a clear plan that allows you to manage the elearning project
- Allows you to visualize the project design, showing how different elements fit together
- Facilitates team collaboration and/or handovers, ensuring everyone has the same vision
- Helps to identify weak areas or gaps in the learning design
- Speeds up the content development process and facilitates planning for current and future projects
- Makes it easier to align training with learning and business goals and meet performance KPIs
- Documents changes and updates to the instructional design project
How to create a storyboard for instructional design: Step-by-step
What’s the best way to eat an elephant? One bite at a time. Same goes for instructional design projects.
No matter the size, a well-structured elearning storyboard is the best route forward. Follow these step-by-step instructions to create your own.
Step 1: Define a plan
This early planning phase is essential for your project. So, gather your stakeholders together and determine the following:
- Assess training needs
- Identify your learning audience
- Define clear learning objectives and link those to business goals
- Choose a storyboarding tool, such as Google Docs, PowerPoint, or an elearning authoring tool. Simple is often best.
Step 2: Choose an instructional design model
Next, you’ll need to pick an instructional design model.
Whether you go for the ADDIE model or a modern approach like Action Mapping, the important thing is to follow a framework.
Action Mapping is one of the most effective instructional design models for corporate training environments. Why? Because it cuts to the chase and focuses on defining the actions your audience must perform to meet a specific business objective.
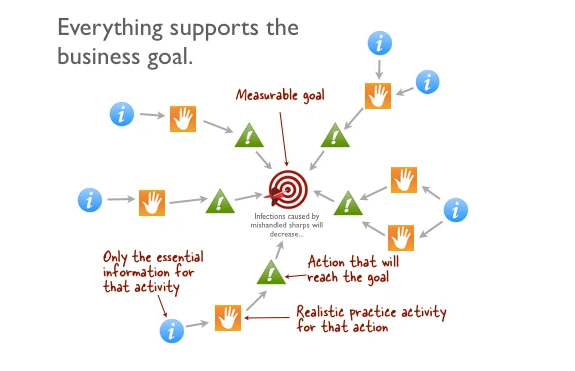
In other words, it focuses on actively improving job performance (what people need to do) instead of simply providing information (what you think they need to know).
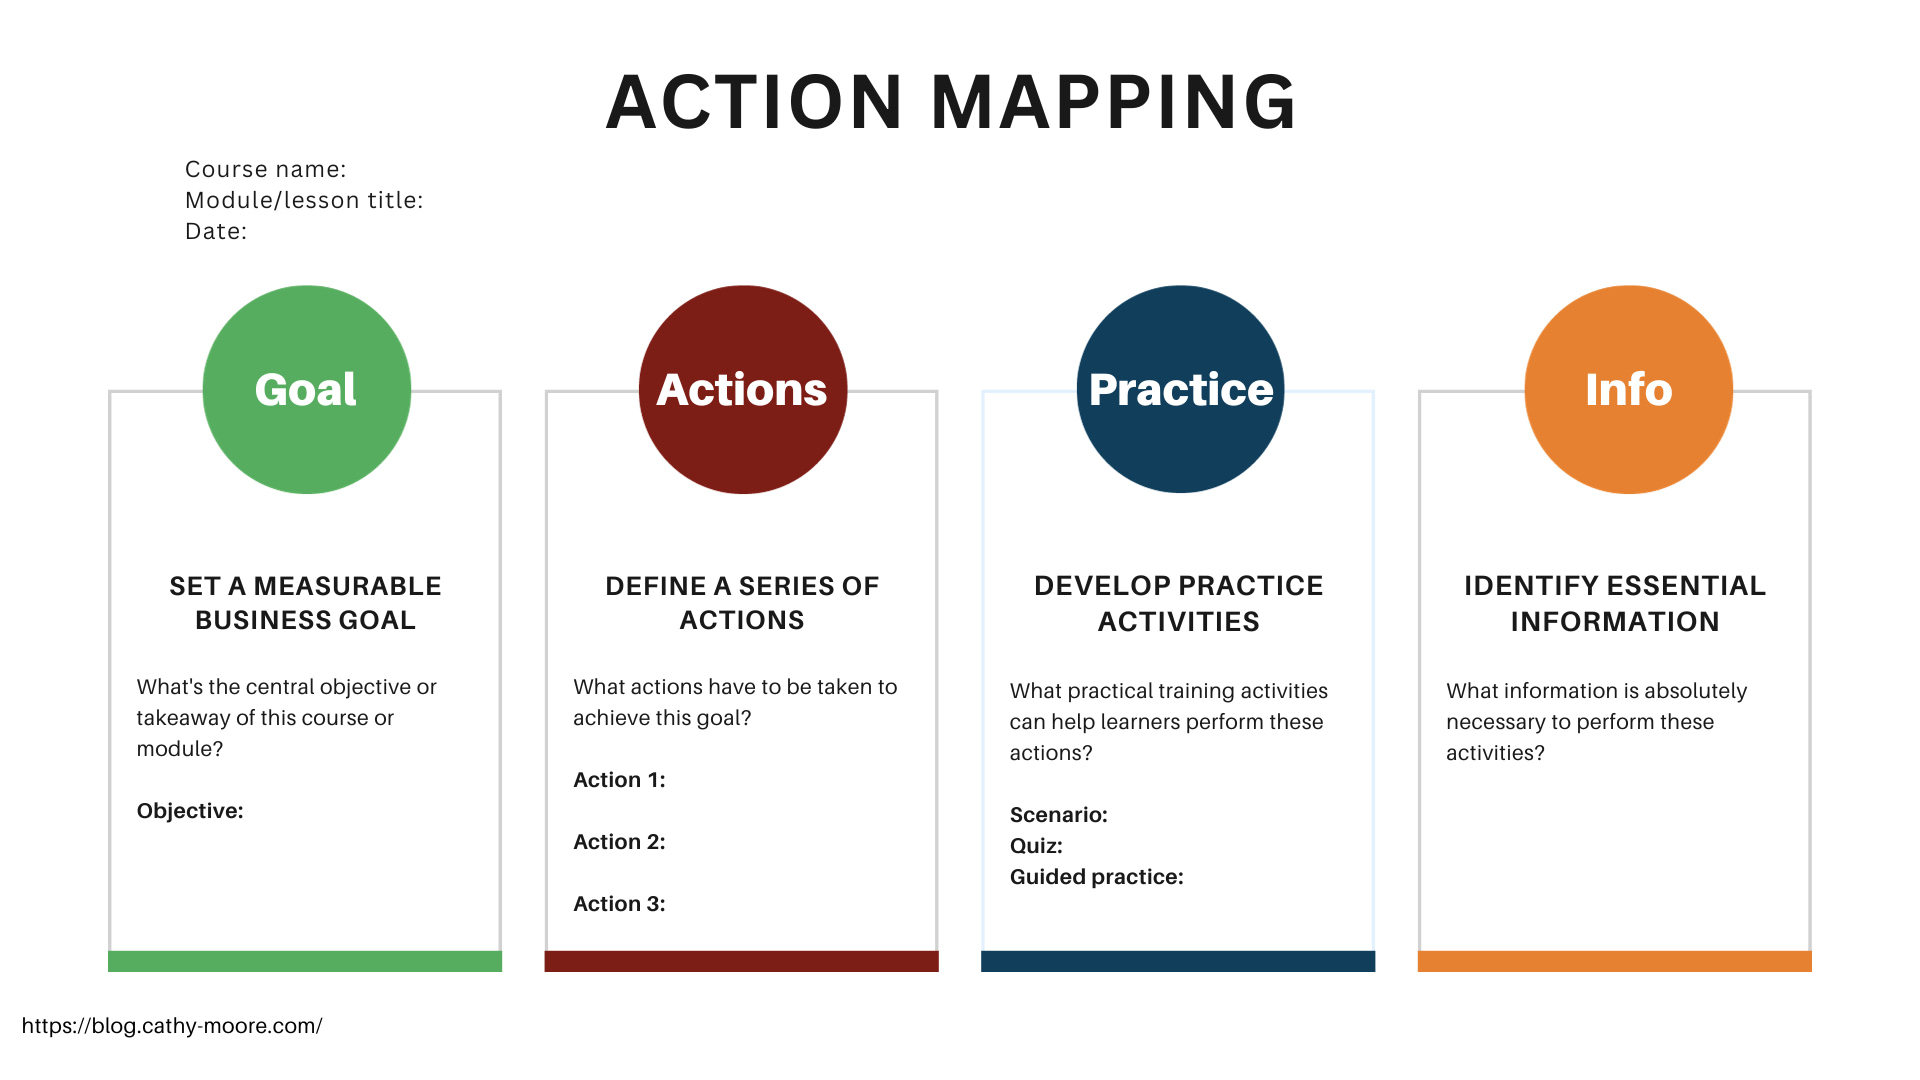
Action mapping breaks training programs down into four pillars:
The main pillars of Action Mapping
| Steps | Questions to ask |
|---|---|
| Set a measurable business goal | What’s the problem? How do we know there’s a problem? How will we know we’ve solved it? |
| Define a series of actions to reach the goal | What do people need to do? Why aren’t they doing it? |
| Develop practice activities to teach learners how to master these actions | How can we help them practice what they need to do? |
| Decide which information is essential to perform these activities | What information do learners absolutely need to complete the practice activity? |
Step 3: Decide on a level of detail
Consider who the storyboard is for (clients, stakeholders, team members, just you…). This will help you determine how much detail to include.
The more detail, the better.
Thinking back to our earlier analogy of a blueprint, you’ll also want to create one for your workflows and systems. Staying organized is the best way to stay on track, after all.
Here are some organization tips:
- Color code correct and incorrect answers
- Number and title every slide
- Label all files with a clear system
- Build an interactive prototype to share with shareholders
Step 4: Pull your resources
You’re now ready to gather all of your resources, assets, references and templates together to take stock of what you have and what you need to develop.
Create a catalog and structure it, so you can easily find all of your resources, such as:
- Graphics
- Charts
- Software simulations
- Videos
- Documents
- Scripts
- Job aids
Step 5: Select a storyboarding template
We don’t need to remind you of the benefits of using a storyboard for instructional design. But we will stress the importance of choosing a storyboard template that fits your elearning project and working style.
Consider the following when choosing the right template for the job:
- What instructional design approach you’re using
- The size and complexity of your course
- The main content format you’ll be using
For instance, if you’re using Action Mapping to develop your course, you’ll want a storyboard template that aligns with this approach.
To get you off the ground, we’ve created a no-nonsense Action Mapping storyboard template. Simply download it and tailor it to your heart’s content.

Download our free Action Mapping storyboard template [DOC].
Step 6: Add the content to your storyboard template
It’s now time to add your content and arrange it in sequences within your storyboard. This is a crucial step, so take your time to carefully consider the order of the training material and how it flows.
As you go about adding interactions, scripts, and navigation, keep the learner in mind. Where do they go next? How do they get there?
Concoct as many “What if?” scenarios as possible and ensure your storyboard answers each one with a clear roadmap.
Step 7: Get feedback from fresh eyes
Make sure the storyboard is clear by gathering feedback from stakeholders and team members. They will look at it from different perspectives, helping you pinpoint weaknesses in structure, content, or style.
Key tips for storyboarding success
Trial and error is an inevitable part of creating a successful storyboard for instructional design projects. What works for one project (or team) may not cut the mustard for another.
As such, the best way to master the art and science of storyboarding is by doing. With that said, there are some hacks that can help you nail your storyboarding efforts the first time around.
Follow these tips for elearning storyboarding success:
- Select the right template for your instructional design project and tailor it to suit your approach. This Ultimate List of Free Storyboard Templates for elearning is a good place to look.
- Be visually consistent. Use your storyboard to cement the look and feel of the course, making sure each screen is cohesive.
- Define the structure of the full project first, beginning with the end goal in mind. Circle back regularly throughout the storyboard to ensure each component directly contributes to those goals. What is the performance issue you want to fix? How does this activity achieve that?
- Keep track of all assets needed and used. We cannot stress how much time and effort this will save you down the line. Having a clear labelling system and including those codes in the storyboard makes it easier to sequence your project and reuse objects in the future.
- Stick to one learning objective per screen. Storyboards are an excellent way to catch cluttered screens early. Take a bird’s eye view of the course and look out for slides that have too much going on. Streamline them to focus on one learning objective.
- Include scripts for everything. Literally everything. This includes navigation buttons, scenario-based activities, and instructions.
- Cater to different learning types. Before you get deep into the development process, storyboards offer a nice moment to take a step back. Is the content too much of the same? How can you make it more dynamic? Ideally, try to avoid having multiple screens in a row with the same type of content format or activities. Variety is the spice of life after all.

Next steps
With a template in hand and some best practices in your back pocket, it’s time to go forth and start your instructional design project.
As with anything, be sure to tailor the template to align with your elearning project and instructional design approach.
Want more inspiration? Browse the blog for the best tips and tricks for instructional designers and corporate training professionals.

By Nicola Wylie
Nicola Wylie is a learning industry expert who loves sharing in-depth insights into the latest trends, challenges, and technologies.